Build Your First AI Agent with Python: A Beginner-Friendly Tutorial
Learn to build an AI agent with Python step by step. Set up your environment, implement tool calling, run the project, and troubleshoot common errors.

By the end of this tutorial, you will have written a Python script that takes a user’s question, decides if it needs to look up information from a local dataset, executes a Python function to get that data, and delivers a conversational answer.
If you want to build an AI agent with Python, you don’t need to start with massive, complex frameworks. In fact, the best way to understand agentic AI is to build a minimal, transparent application from scratch using standard Python and a simple API.
This project will not build a fully autonomous, self-coding robot. Instead, it will teach you the core mechanism behind every advanced AI agent: tool calling.
What We Will Build
We are going to build a Local Store Inventory Assistant.
When a euser asks, “Do we have any laptops in stock?”, a standard language model would guess or say it doesn’t have access to your store’s data. Our agent will:
- Receive the user’s input.
- Recognize that it needs inventory data.
- Call a custom Python tool (
get_store_inventory). - Read the Python tool’s result (e.g., “5 laptops”).
- Return a friendly, accurate response to the user based on that specific data.
What Is an AI Agent?
Before we code, let’s clarify a few concepts.
- AI Model: A massive mathematical formula that predicts the next word in a sentence (like GPT-4).
- Chatbot: An application that sends your text to the model and displays the returned text.
- AI Agent: An application that allows the AI model to interact with the outside world by granting it access to tools.
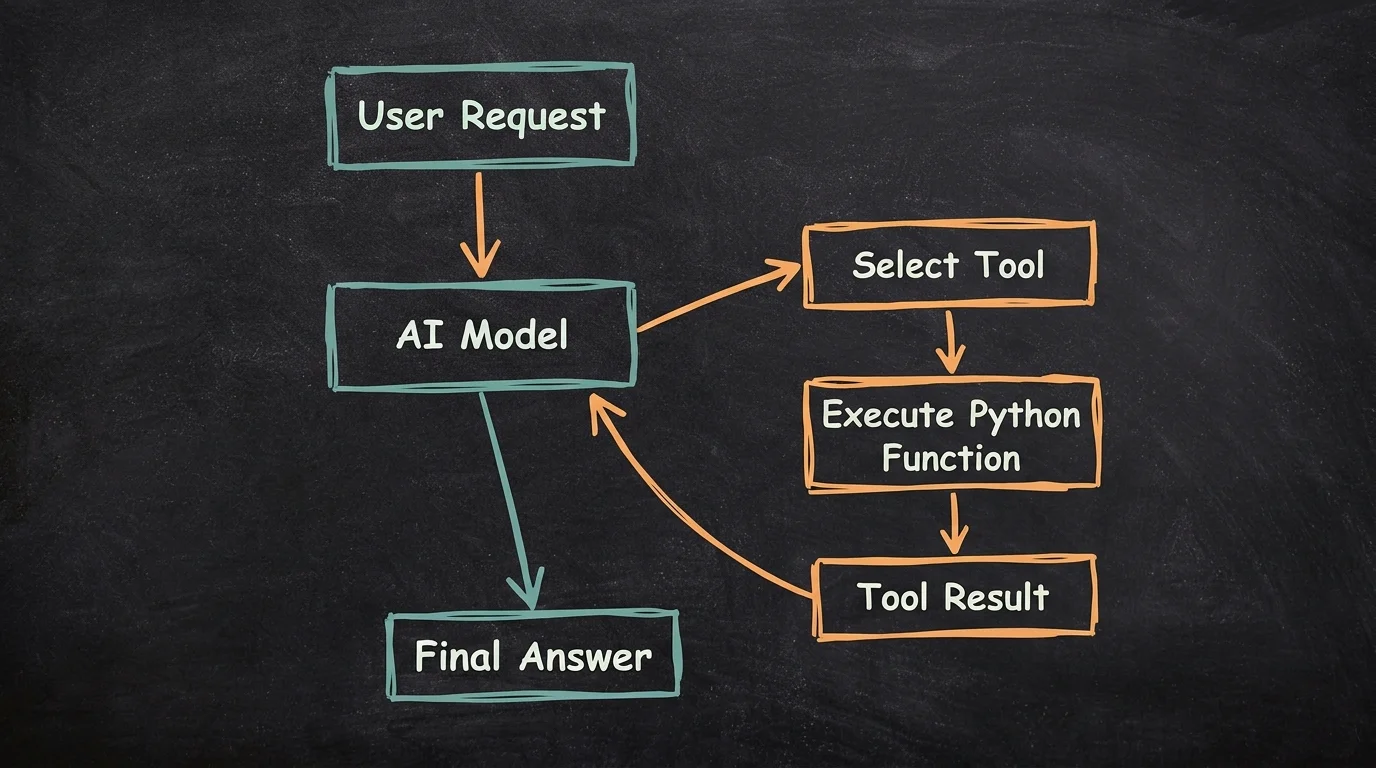
Tools are simply functions you write in Python. They can search a database, fetch a web page, or do math. An agent requires multiple steps because the model must first request the tool, pause while your Python code runs, and then formulate an answer once it receives the tool’s output.
For a deeper dive into agent architecture, read our guide on AI Agents Explained: How They Work, Tools, and Real-World Examples in 2026.
Prerequisites
To follow this tutorial, you need:
- Basic Python knowledge: Familiarity with variables, functions, and dictionaries.
- Python Installed: Python 3.8 or newer.
- A Code Editor: VS Code, PyCharm, or your terminal.
- Internet Access: To connect to the OpenAI API.
- An OpenAI API Account: You will need an API key. (Note: Using the OpenAI API incurs very small charges based on usage. A few test runs will likely cost fractions of a cent).
You do not need to know how to train an AI model. We will use a pre-trained model via an API.
Step 1 — Set Up the Python Project
First, let’s create a clean workspace. We will use a virtual environment to isolate our project’s packages.
Open your terminal and run these commands:
Create the directory:
mkdir ai-agent-python
cd ai-agent-python
Create a virtual environment:
python -m venv venvActivate the virtual environment:
- On Windows:
venv\Scripts\activate - On macOS/Linux:
source venv/bin/activate
Install the necessary packages:
pip install openai python-dotenvWe use the openai package to communicate with the model, and python-dotenv to securely manage our secret API key.
Your project folder should look like this:
ai-agent-python/
├── venv/
├── .env
├── .gitignore
└── main.py
Step 2 — Configure Your API Credentials
You must never hardcode your API key directly into your Python files. If you accidentally upload it to GitHub, malicious users can run up your bill.
- Go to the OpenAI Platform, sign in, and generate a new API Key.
- Create a file named
.envin your project folder. - Add your key to the file like this:
OPENAI_API_KEY=sk-your-actual-api-key-hereNext, create a .gitignore file and add .env to it. This ensures Git will never track your secret key.
If you ever accidentally expose your key, immediately go to the provider’s dashboard, revoke the key, and generate a new one.
Step 3 — Understand the Agent Architecture
Our Python script acts as the orchestrator.
- The Application: Your Python code manages the conversation history.
- The LLM (Language Model): Decides if a tool should be used based on your system instructions.
- The Tools: Local Python functions that safely execute tasks.
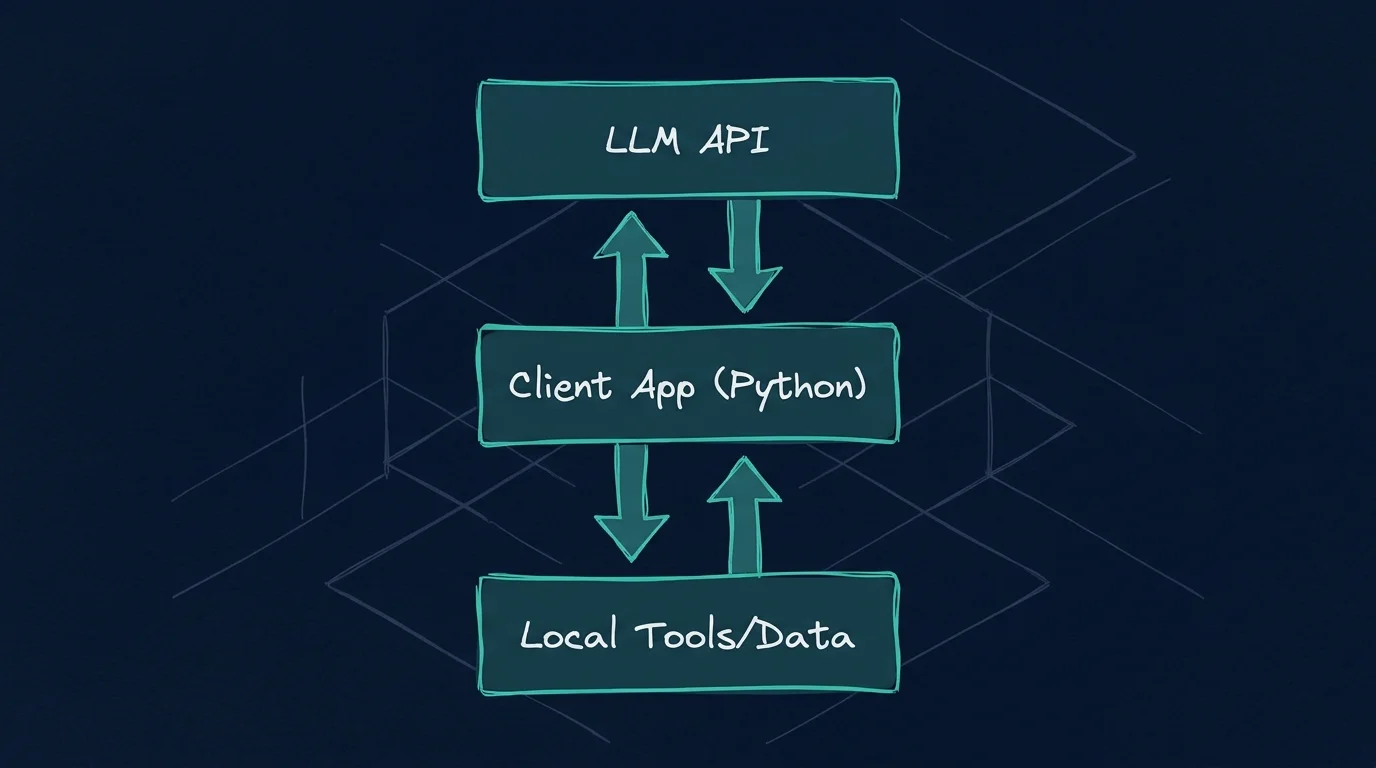
Crucially, the AI model does not run Python code directly. The model simply outputs a text string saying, “Please run the inventory tool with the word ‘laptops’”. Your Python script intercepts this request, runs the tool safely, and sends the result back.
Step 4 — Create the Python Tool
Let’s create the tool the AI will use. Open main.py and write a simple, safe Python function that searches a local dictionary.
import json

# A small local dataset simulating a database
INVENTORY = {
    "apples": 150,
    "bananas": 45,
    "laptops": 5,
    "keyboards": 12
}

def get_store_inventory(item_name: str) -> str:
    """Returns the current inventory count for a specific item."""
    # Clean the input to match our dictionary keys
    item = item_name.lower().strip()

    if item in INVENTORY:
        # Return structured data the AI can easily read
        result = {"item": item, "stock_count": INVENTORY[item]}
        return json.dumps(result)
    else:
        # Handle invalid requests gracefully
        result = {"error": f"Item '{item}' not found in the inventory system."}
        return json.dumps(result)
This function is safe because it only reads from a predefined dictionary. It validates inputs and handles errors neatly.
Step 5 — Connect the Tool to the AI Model
Now, we need to describe this tool to the AI and write the logic that connects them. Add the following code below your tool in main.py.
import os
from dotenv import load_dotenv
from openai import OpenAI

# Load the API key from the .env file
load_dotenv()
client = OpenAI(api_key=os.getenv("OPENAI_API_KEY"))

# 1. Define the tool schema so the AI knows how to use it
tools = [
    {
        "type": "function",
        "function": {
            "name": "get_store_inventory",
            "description": "Get the current inventory stock for a given item in the store.",
            "parameters": {
                "type": "object",
                "properties": {
                    "item_name": {
                        "type": "string",
                        "description": "The name of the item to look up, e.g., 'apples' or 'laptops'"
                    }
                },
                "required": ["item_name"]
            }
        }
    }
]

def run_agent(user_prompt: str):
    print(f"\nUser: {user_prompt}")

    # 2. Setup the initial conversation
    messages = [
        {"role": "system", "content": "You are a helpful store assistant. Use the inventory tool if the user asks about stock."},
        {"role": "user", "content": user_prompt}
    ]

    # 3. Send the prompt and the tool description to the AI
    response = client.chat.completions.create(
        model="gpt-4o-mini", # A fast, cost-effective model
        messages=messages,
        tools=tools,
        tool_choice="auto" # Let the model decide if it needs the tool
    )

    response_message = response.choices[0].message

    # 4. Check if the AI decided to call a tool
    if response_message.tool_calls:
        for tool_call in response_message.tool_calls:
            if tool_call.function.name == "get_store_inventory":
                # Extract the argument the AI provided
                args = json.loads(tool_call.function.arguments)
                item_name = args.get("item_name")

                print(f"[Agent Action] -> Calling get_store_inventory(item_name='{item_name}')")

                # 5. Execute our Python function
                tool_result = get_store_inventory(item_name)
                print(f"[Tool Result]  -> {tool_result}")

                # 6. Add the AI's tool request and the tool's result to the chat history
                messages.append(response_message)
                messages.append({
                    "role": "tool",
                    "tool_call_id": tool_call.id,
                    "content": tool_result
                })

                # 7. Send the updated history back so the AI can formulate a final answer
                final_response = client.chat.completions.create(
                    model="gpt-4o-mini",
                    messages=messages,
                )
                print(f"Agent: {final_response.choices[0].message.content}")
    else:
        # If the AI didn't need a tool, just print its answer
        print(f"Agent: {response_message.content}")

# Test calls
if __name__ == "__main__":
    run_agent("Do we have any laptops in stock right now?")
    run_agent("What is the capital of France?")
Step 6 — Run Your First AI Agent
Save main.py and run the script from your terminal:
python main.pyIllustrative Output:
User: Do we have any laptops in stock right now?
[Agent Action] -> Calling get_store_inventory(item_name='laptops')
[Tool Result]  -> {"item": "laptops", "stock_count": 5}
Agent: Yes, we currently have 5 laptops in stock.

User: What is the capital of France?
Agent: The capital of France is Paris.
Notice how the agent correctly identified that the first question required a database lookup, but the second question did not.
Step 7 — Understand the Execution Flow
Let’s break down exactly what happened during that first request:
- The user submits a question: “Do we have any laptops?”
- The model decides: The API reads our tool schema, recognizes that the
get_store_inventorytool matches the user’s intent, and pauses its text generation. - The model returns a request: It sends back a JSON object asking to execute
get_store_inventorywith the argumentitem_name="laptops". - Python executes: Our
if response_message.tool_calls:block catches this request, runs our local dictionary lookup, and gets the result{"item": "laptops", "stock_count": 5}. - Data is returned: We append this result to the
messageslist under the role"tool". - Final response: We send the whole conversation back to the API. The model reads the tool output and drafts a natural, conversational response for the user.
Limitation note: This specific script only supports one round of tool calling. Complex autonomous agents use while loops to call multiple tools in a row, but loops must be carefully controlled to avoid infinite API requests.
Step 8 — Test the AI Agent
To ensure your agent is robust, try changing the prompt at the bottom of the script.
| Test Case | Expected Behavior | Actual Result | What a failure indicates |
|---|---|---|---|
"How many bananas are left?" | Calls tool with bananas. Returns 45. | [Test yourself] | The tool description isn’t clear enough. |
"Do you sell cars?" | Calls tool with cars. Tool returns an error. Agent says no. | [Test yourself] | The model ignored the tool’s error message. |
"Hello, who are you?" | No tool called. Replies as a store assistant. | [Test yourself] | The agent is over-relying on the tool. |
You can tell an application error (like a Python crash) apart from a model error by watching the terminal. If Python throws a traceback, your code has a bug. If the agent gives a wildly wrong text answer, the model got confused.
Common Errors and How to Fix Them
ModuleNotFoundError: No module named 'openai': You forgot to activate your virtual environment, or you didn’t runpip install openai.openai.AuthenticationError: Your API key is missing, invalid, or your.envfile isn’t loading properly. Double-check your.envfile name.openai.RateLimitErrororInsufficientQuotaError: You need to add billing credits to your OpenAI account. The API is not entirely free.- KeyError in Python: If the model invents arguments that your Python function isn’t expecting, your code might crash. Always validate
args.get("expected_key").
Security and Cost Considerations
As you expand this project, keep these rules in mind:
- API Costs: Every time you send data to the API, it costs fractions of a cent. If you build a loop that calls tools indefinitely, your bill will skyrocket. Always use iteration limits.
- Keep Keys Private: Never commit
.envto GitHub. - Restrict Tool Permissions: If you write a tool that deletes database rows, an AI hallucination could wipe your data. Only give agents “read-only” access to start.
- Human-in-the-Loop: For sensitive actions (like sending an email or processing a refund), the application should pause and ask for human keyboard input before executing the tool.
Improve Your AI Agent
Now that you have a working base, what should you do next?
- Add a second tool: Create a
get_item_price(item_name)function and add it to thetoolsarray. Watch how the model decides which one to use. (Great for beginners). - Add a While Loop: Wrap the execution block in a
whileloop so the agent can call the inventory tool, then immediately call the price tool before answering the user. Be sure to add amax_iterations = 5safeguard! - Build a User Interface: Use a library like Streamlit to turn your terminal script into a web app.
Avoid jumping straight into complex frameworks like LangChain or CrewAI until you thoroughly understand this native SDK execution flow.
Frequently Asked Questions
1. Can beginners build an AI agent with Python?
Yes. By using pre-trained models via APIs, building an agent is mostly an exercise in basic Python routing, functions, and working with JSON data.
2. Do I need to train an AI model?
No. You use an API to connect to an existing, highly intelligent model (like GPT-4, Claude, or Llama) that handles the reasoning for you.
3. Is it possible to build an AI agent for free?
You can build the code for free, but connecting to top-tier models usually requires a few cents in API credits. Alternatively, you can use local models via tools like Ollama, which are completely free but require a powerful computer.
4. Which Python libraries are needed?
For this basic setup, only the openai SDK and python-dotenv for security.
5. What is the difference between an AI agent and a chatbot?
A chatbot just talks to you. An AI agent can trigger Python functions (tools) to look up real data or take actions before talking to you.
6. Can an AI agent use external tools?
Yes. The Python function we built checked a local dictionary, but you could easily write a function that queries a real SQL database or calls a weather API.
7. How do I protect an API key?
Use a .env file and the python-dotenv library, and ensure .env is listed in your .gitignore file.
8. Why is my AI agent not calling its tool?
The description in your tool schema might be too vague. The model relies entirely on your text descriptions to understand what a tool does and when to use it.
9. Can I run an AI agent locally?
Yes. You can swap the OpenAI SDK for a local runner like Ollama to run smaller open-source models completely offline.
10. How can I test whether my AI agent is reliable?
Write edge-case prompts (e.g., asking for items that don’t exist, or asking for unrelated information) and ensure your Python tools handle the errors gracefully without crashing.
Conclusion
Congratulations! You have successfully learned how to build an AI agent with Python.
While enterprise-level agents involve vector databases, complex memory systems, and multi-agent orchestration, they all rely on the foundational concept you just built: passing a request to a model, reading its structured tool choice, executing safe Python code, and returning the result.
Before exploring massive agent frameworks, take some time to add a few more tools to your script and experiment with the logic.
Next Steps: Ready to strengthen your underlying skills? Check out our guide on Python for Data Science to learn how to manage larger local datasets for your agent to explore.